 Save
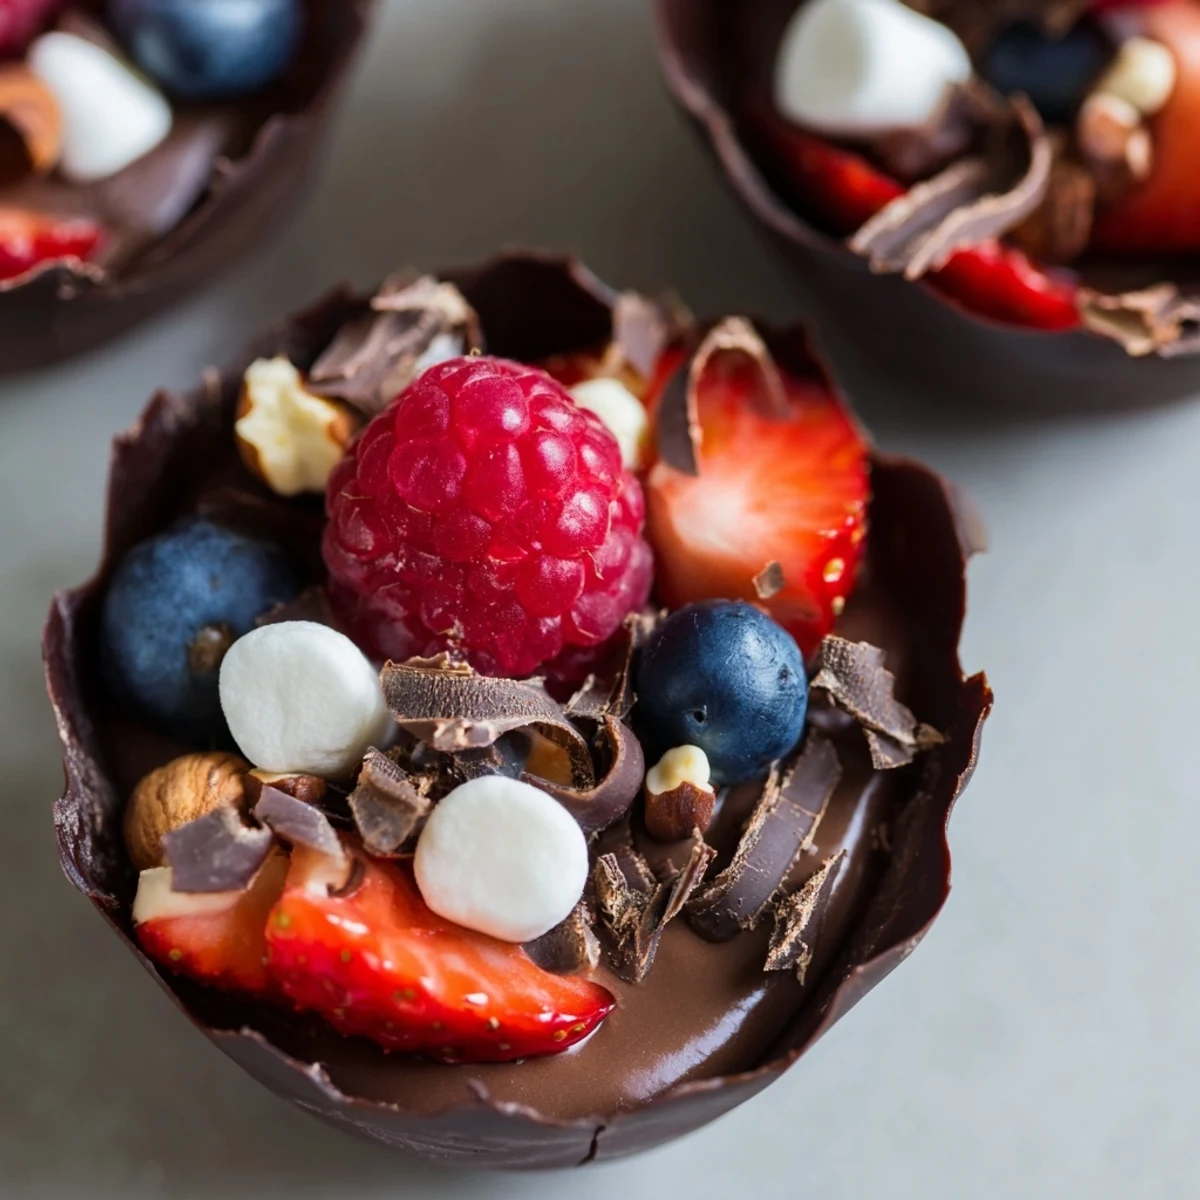
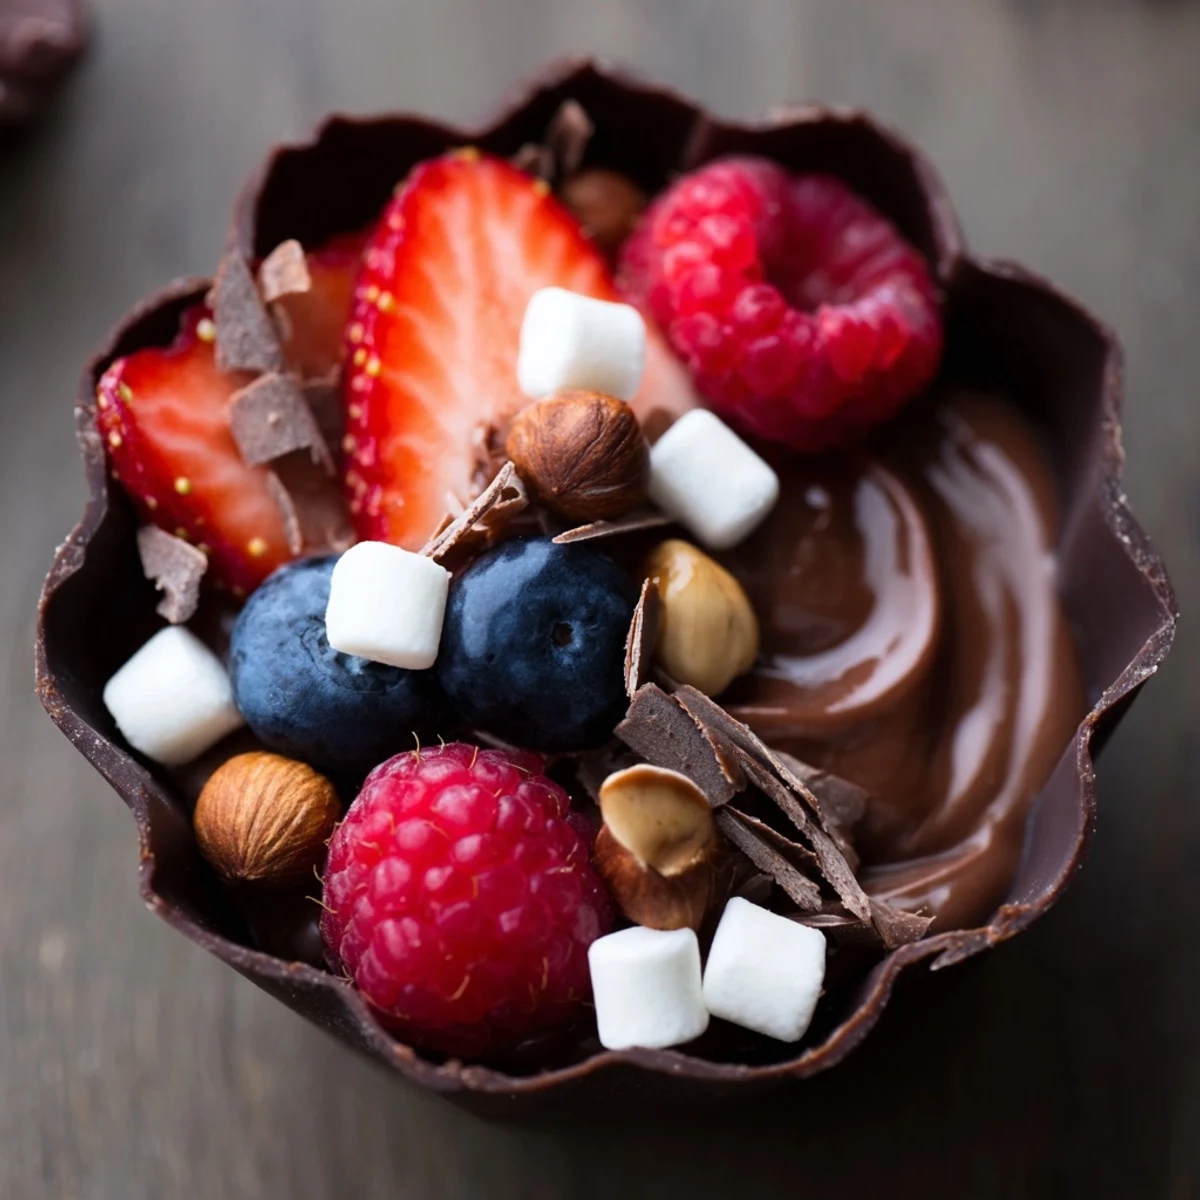
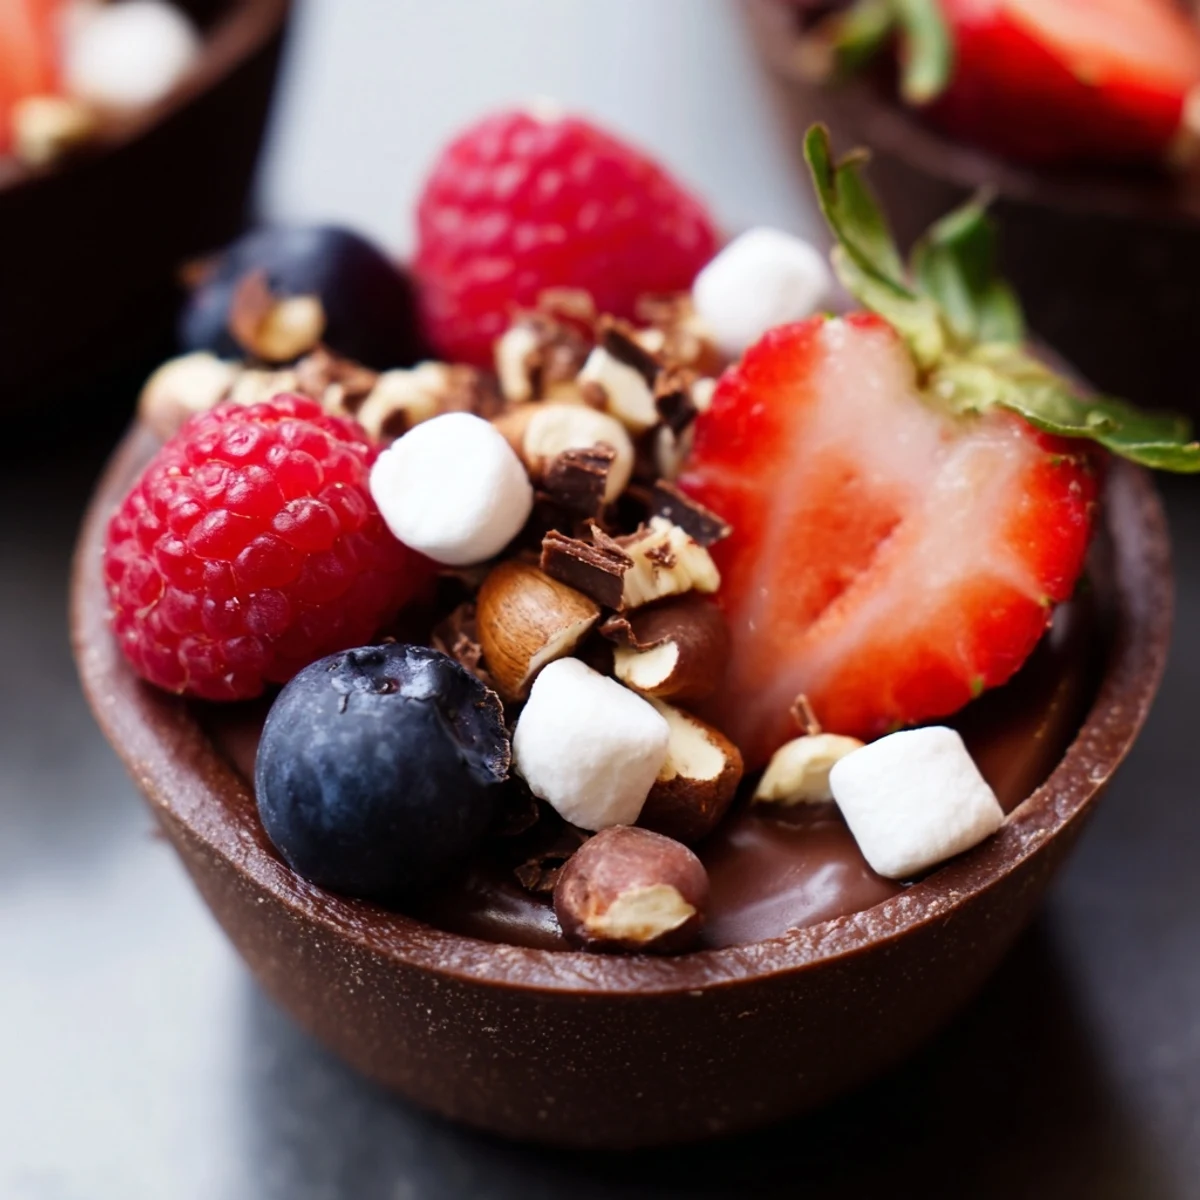
Save These indulgent chocolate grazing cups feature handmade dark chocolate shells filled with silky chocolate mousse and topped with fresh berries, nuts, and edible decorations. The combination creates stunning individual portions perfect for dessert tables or special gatherings.
Each cup balances rich, smooth chocolate with fresh, tart berries and crunchy textures from nuts and marshmallows. The edible gold adds a luxurious finishing touch that elevates these treats to something truly special.
Ready in about an hour with simple techniques, these grazing cups are easier to make than they appear and can be customized with different chocolates and toppings to suit any occasion.
The first time I made these chocolate cups, my kitchen smelled like a chocolate shop had moved in. I was hosting a dinner party and wanted something that looked fancy but didn't require me to be chained to the oven all day. My friend Sarah actually thought I'd ordered them from a boutique bakery, which I took as the ultimate compliment.
I made these again last Valentine's Day and they disappeared faster than anything else on the dessert table. What I love most is that everyone gets their own perfect portion—no fighting over who gets the bigger slice. Plus, there's something so satisfying about cracking through that chocolate shell to get to the creamy mousse inside.
Ingredients
- Dark chocolate 200g for cups, 100g for mousse: I've learned that spending a little extra on good quality chocolate makes all the difference in both texture and taste
- Heavy cream 200ml: Make sure it's cold straight from the fridge—warm cream won't whip up properly no matter how long you beat it
- Powdered sugar 2 tbsp: This dissolves into the cream better than granulated sugar and gives you that silky smooth texture
- Vanilla extract 1 tsp: Pure vanilla extract is worth the investment here since the flavor really shines through the rich chocolate
- Fresh mixed berries 1 cup: Use whatever looks best at the market or freeze extra summer berries for colder months
- Chopped nuts 2 tbsp: I love hazelnuts with dark chocolate but almonds and pistachios work beautifully too
- Mini marshmallows 2 tbsp: These add such a fun, nostalgic element and their soft texture contrasts perfectly with the crunchy chocolate
- Chocolate curls or shavings 2 tbsp: Use a vegetable peeler on a room temperature chocolate bar for restaurant worthy curls
- Edible gold leaf or pearls 1 tbsp optional: These make the cups look absolutely luxurious but taste the same without them
Instructions
- Melt the chocolate for your cups:
- Break your chocolate into pieces and microwave in 30 second bursts, stirring between each, until completely smooth. Be patient—rushing this causes the chocolate to seize and ruin your silky texture.
- Create the chocolate shells:
- Use a pastry brush or small spoon to coat the inside of 6 cupcake liners with melted chocolate. I find rotating the liners as I work helps get even coverage, and don't forget to coat the bottoms thoroughly.
- Chill until firm:
- Pop the tray in the refrigerator for at least 20 minutes. The chocolate should be completely solid before you attempt to remove the liners or they'll lose their shape and leave you with a melted mess.
- Carefully unmold the cups:
- Peel away the liners gently, starting from the top edge. If a cup cracks, don't panic—you can patch it with a little melted chocolate and re-chill, or just embrace the rustic look.
- Prepare the mousse base:
- Melt the remaining 100g chocolate using the same method as before, then let it cool slightly while you whip the cream. Hot chocolate will deflate your whipped cream instantly.
- Whip the cream:
- In a chilled bowl, beat the heavy cream with powdered sugar and vanilla until soft peaks form. You want it thick enough to hold its shape but still foldable—over whipped cream will make your mousse grainy.
- Combine gently:
- Stir a spoonful of whipped cream into the melted chocolate to lighten it, then fold the chocolate mixture into the remaining cream. Use a spatula and gentle figure eight motions to keep all that air you whipped in.
- Fill the cups:
- Pipe or spoon the mousse into each chocolate cup, filling them about two thirds full. The mousse will settle slightly, so don't worry if it looks a little tall initially.
- Add the finishing touches:
- Arrange your toppings however you like—I start with berries in the center, then add nuts, marshmallows, and chocolate curls around the edges for that professional dessert table look.
- Final chill:
- Refrigerate for at least 20 more minutes before serving. This lets the mousse set completely and the flavors meld together beautifully.
 Save
Save These have become my go-to dinner party dessert because I can assemble everything in advance and just pull them out when guests arrive. Last month my eight year old niece helped me add the toppings and declared herself the official garnish queen—she was so proud of her creation.
Making Ahead Like a Pro
The chocolate cups and mousse both keep beautifully in the refrigerator for up to 24 hours. I've learned to make the cups the day before and store them in an airtight container with parchment paper between layers. The mousse can sit in a piping bag in the fridge until you're ready to fill them. Just resist the urge to assemble everything until the day you're serving, or those berries will weep and make the chocolate soggy.
Flavor Variations I Love
Sometimes I'll swap in milk or white chocolate for either the cups or the mousse—white chocolate cups with dark chocolate mousse look stunning and offer that perfect contrast. For a grown up version, I've added a tablespoon of orange liqueur or espresso to the melted chocolate before folding it into the cream. During summer, I'll tuck a whole fresh raspberry into the bottom of each cup before piping in the mousse for a hidden surprise center.
Serving Suggestions
These cups are elegant enough for a wedding dessert table but casual enough for a weeknight treat. I love serving them on a pretty platter with fresh mint leaves scattered around for color. They pair beautifully with dessert wine, port, or even a simple espresso after a rich meal. For a grazing table, arrange them alongside other finger desserts and let guests help themselves.
- Set up a toppings bar and let guests customize their own cups for interactive dessert fun
- Make mini versions using a mini muffin tin for bite size party treats that guests can eat in one bite
- Wrap individual cups in cellophane bags tied with ribbon for stunning edible party favors
 Save
Save There's something so satisfying about serving a dessert that makes people gasp before they even take a bite. These chocolate cups have that effect every single time, and I love watching friends discover that yes, the entire thing is edible.
Recipe FAQs
- → How long do chocolate grazing cups stay fresh?
-
These cups are best made and served on the same day for optimal texture. The chocolate shells can be prepared ahead and stored in an airtight container for up to 3 days, but fill them with mousse and toppings within a few hours of serving to prevent the mousse from weeping and the fresh toppings from softening.
- → Can I make these chocolate cups without silicone liners?
-
If you don't have silicone liners, you can use paper cupcake liners, though they may be more difficult to remove cleanly. Alternatively, create free-form cups by painting melted chocolate onto the outside of greased inverted muffin tins or small bowls, then chill and peel off.
- → What other toppings work well with these grazing cups?
-
Beyond the suggested toppings, try crushed cookies, caramel sauce, coconut flakes, fresh mint leaves, citrus zest, or small pieces of fudge. Seasonal fruits like pomegranate seeds, sliced figs, or kiwi also work beautifully.
- → Can I use milk or white chocolate instead?
-
Absolutely. Milk chocolate creates a sweeter, creamier profile while white chocolate offers a delicate vanilla flavor. Keep in mind that white chocolate has a lower melting point and may require longer chilling time to set properly.
- → How do I prevent the chocolate cups from cracking when removing liners?
-
Ensure the chocolate is completely chilled and set before attempting to remove the liners. Peel slowly and gently, starting from the top edge. If the chocolate feels soft, return to the refrigerator for additional time. Working in a cool room also helps prevent cracking.
- → Can I make these chocolate grazing cups ahead for a party?
-
Prepare the chocolate cups and mousse separately up to 24 hours in advance. Store cups at room temperature in an airtight container and refrigerate the mousse. Assemble and garnish 2-4 hours before serving, then keep chilled until guests arrive.